Some appetizers have a way of bringing everyone into the kitchen before dinner is even ready. These Cheesy Bacon Stuffed Mini Peppers are filled with creamy cheese, crispy bacon, sharp cheddar, and green onions, then baked until warm, bubbly, and lightly golden. They’re colorful, easy to make, and packed with the kind of familiar flavors that make a party platter disappear fast.
They’re perfect for game day, holiday gatherings, potlucks, family parties, or a casual weekend snack. With just 15 minutes of prep and a short bake in the oven, you can have a tray of warm, cheesy stuffed peppers ready to serve without spending your whole afternoon in the kitchen.
Why You’ll Make This Again
The combination of sweet mini peppers, creamy cream cheese, sharp cheddar, and salty crispy bacon is hard to resist. The peppers soften just enough in the oven while still keeping a pleasant bite, and the cheese filling becomes warm, creamy, and bubbly.
A little Worcestershire sauce adds savory depth without making the filling complicated, while garlic powder and green onions round everything out with simple, familiar flavor.
Best of all, these stuffed peppers are incredibly easy to prepare. The filling takes only a few minutes to mix, and the peppers need just 10–12 minutes in the oven. They’re an ideal appetizer when you want something homemade that still feels effortless.
How This Comes Together
Start by slicing the mini sweet peppers in half and removing the seeds and membranes. Once they’re ready, the creamy filling comes together in a single bowl.
Mix softened cream cheese with crispy crumbled bacon, shredded cheddar, green onions, garlic powder, and Worcestershire sauce until everything is evenly combined. Spoon the mixture into the pepper halves, add a little extra cheddar on top, and bake until the cheese is melted and bubbly.
After a few minutes of cooling, finish them with fresh chopped cilantro if you like. The result is a colorful little appetizer with a creamy center, crisp bacon bits, and tender sweet peppers in every bite.
What You’ll Need
Just a handful of everyday ingredients are needed to make these little peppers taste like something special.
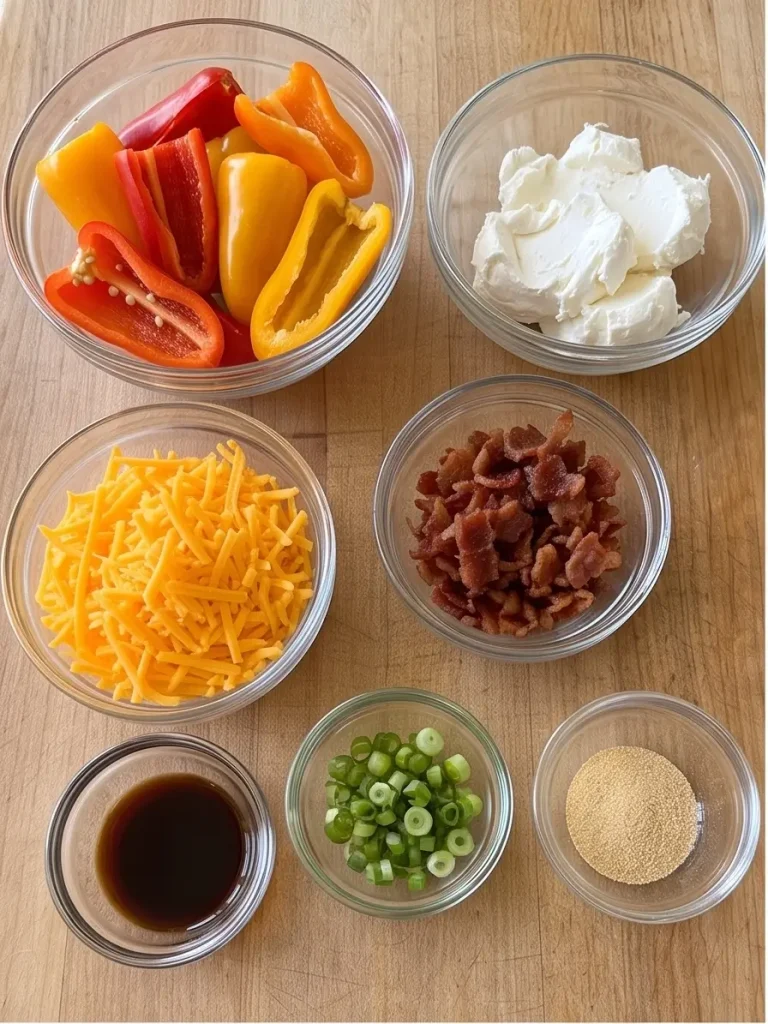
- 6 mini sweet peppers — sliced in half with seeds and membranes removed
- 4 ounces cream cheese — softened for easy mixing
- 4 slices bacon — cooked until crisp and crumbled
- ½ cup shredded cheddar cheese — plus extra for topping
- 2 tablespoons green onions — sliced
- 1 teaspoon Worcestershire sauce — adds savory depth
- ½ teaspoon garlic powder
- Chopped cilantro — optional, for topping
Step-by-Step Directions
Step 1 — Prepare the Peppers
Preheat the oven to 400°F. Lightly spray a baking sheet with nonstick cooking spray.
Slice each mini sweet pepper in half lengthwise and remove the seeds and membranes. Arrange the pepper halves cut-side up on the prepared baking sheet.
Step 2 — Make the Bacon Cheese Filling
In a small bowl, beat together the softened cream cheese, crumbled bacon, sliced green onions, garlic powder, shredded cheddar cheese, and Worcestershire sauce.
Mix until the filling is smooth and evenly combined, with the bacon, cheese, and green onions distributed throughout.

Step 3 — Fill the Peppers
Spoon the cream cheese mixture into each pepper half, using about 1 heaping tablespoon per pepper half. Spread the filling gently so it sits evenly inside the peppers without overflowing.

Step 4 — Add Extra Cheese
Arrange the stuffed peppers on the baking sheet and sprinkle a little extra shredded cheddar over each one. This extra cheese melts over the filling and creates a beautiful bubbly topping.
Step 5 — Bake Until Bubbly
Bake for 10–12 minutes, or until the cheese is melted and bubbly and the peppers have softened slightly.
Step 6 — Finish and Serve
Remove the peppers from the oven and let them cool slightly before serving. If desired, sprinkle the tops with freshly chopped cilantro for a bright, fresh finish.
How to Serve It
Serve these stuffed mini peppers warm on a large platter while the cheese is still soft and bubbly. They make an easy appetizer for game day, holiday parties, potlucks, cookouts, or casual family gatherings.
For a bigger appetizer spread, pair them with our Cowboy Cream Cheese Stuffed Banana Peppers. Both recipes bring creamy cheese and tender peppers to the table, but with different seasonings and textures.
They’re also right at home beside our Jalapeño Popper Pinwheels for a party platter filled with creamy cheese, bacon, and pepper flavors.
If you want something crispy and potato-filled alongside the peppers, our Smashed Potato Cups make another fun addition to a game day or party spread.
Leftovers & Storage
Store leftover stuffed mini peppers in an airtight container in the refrigerator for up to 3 days. Allow them to cool before transferring them to the container.
To reheat, place the peppers on a baking sheet and warm them in a 350°F oven for about 8–10 minutes, or until heated through. An air fryer also works well for reheating small portions.
The microwave can be used when you’re in a hurry, although the peppers and filling will be softer. For the best texture, reheating in the oven keeps the cheese warm and helps the edges of the peppers retain some of their roasted texture.
Make It Even Better (Pro Tips)
- Soften the cream cheese first. Room-temperature cream cheese blends much more easily and creates a smooth filling.
- Cook the bacon until crisp. Crispy bacon adds a wonderful contrast to the creamy cheese filling.
- Drain the bacon well. Let cooked bacon rest on paper towels before crumbling it so excess grease doesn’t loosen the filling.
- Use freshly shredded cheddar. It melts beautifully and gives the topping a smoother, more appealing finish.
- Don’t overfill the peppers. A generous spoonful is enough. Leaving a little space around the edges helps keep the filling neatly contained.
- Keep an eye on the oven. Mini peppers are small and cook quickly, so check them around the 10-minute mark.
- Let them cool briefly. A few minutes of resting makes them easier to pick up and gives the hot filling time to settle.
Easy Ways to Change It Up
- Make them spicy: Add finely diced jalapeño to the cream cheese mixture or sprinkle in a pinch of cayenne pepper.
- Try pepper jack: Replace some or all of the cheddar with pepper jack for extra heat and a creamy, melty finish.
- Add ranch flavor: Mix a teaspoon of ranch seasoning into the cream cheese filling for a familiar party-appetizer twist.
- Use green onions generously: Add extra sliced green onions to the filling and sprinkle a few fresh pieces over the finished peppers.
- Make them smoky: Add a pinch of smoked paprika to the filling for deeper flavor that pairs especially well with the bacon.
- Try a different topping: Finish with chopped parsley, chives, cilantro, or a small drizzle of hot sauce.
Quick Questions
Are mini sweet peppers spicy?
No. Mini sweet peppers are naturally mild and have a gentle sweetness, which makes them a great choice for a family-friendly stuffed appetizer. If you want some heat, add jalapeño, cayenne, or hot sauce to the filling.
Can I make these stuffed peppers ahead of time?
Yes. You can prepare the peppers and mix the filling several hours ahead. Stuff the peppers, cover them, and refrigerate until you’re ready to bake. For the best texture, bake them shortly before serving.
Can I use turkey bacon?
Yes. Turkey bacon can be substituted for regular bacon if you prefer. The flavor will be a little lighter, but the cream cheese and cheddar will still give the filling plenty of richness.
Can I use another cheese instead of cheddar?
Absolutely. Pepper jack, Colby Jack, Monterey Jack, or a mild Mexican cheese blend can all work well. For a stronger flavor, smoked cheddar or sharp white cheddar would also be delicious.
What else can I serve with stuffed mini peppers?
They pair well with other easy finger foods, grilled meats, burgers, sandwiches, and party snacks. For a creamy and spicy companion, try our Jalapeño Popper Pinwheels, or add Smashed Potato Cups for something crispy and cheesy.
“Creamy cheese, crispy bacon, sweet little peppers, and a bubbly cheddar topping—these are the kind of bites that make everyone gather around the appetizer table.”— Ava

Pineapple Jalapeño Pepper Jelly
Ingredients
Equipment
Method
- Prepare the pineapple, red bell pepper, and jalapeños. When working with jalapeños, wear gloves to protect your hands and avoid touching your face. For a milder pepper jelly, remove the jalapeño seeds. If you prefer more heat, leave some of the seeds in the peppers before finely chopping them.
- Add the crushed pineapple, finely chopped red bell pepper, chopped jalapeños, and lemon or lime juice to a large heavy-bottomed pot. Stir everything together well.
- Add all 6 cups of granulated sugar to the pot. Stir thoroughly until the sugar is well incorporated throughout the pineapple and pepper mixture.
- Place the pot over medium-high heat and bring the mixture to a full rolling boil, stirring frequently as it heats. Once boiling, continue cooking for about 5 minutes, stirring often so the mixture doesn’t stick to the bottom of the pot.
- Stir in the liquid pectin. Bring the mixture back to a full rolling boil and boil for exactly 1 minute, stirring constantly.
- Remove the pot from the heat. If foam has collected on the surface, skim it off with a spoon if desired.
- For refrigerator storage, carefully ladle the hot jelly into clean, warm jars, leaving about ¼ inch of headspace. Allow the jars to cool before covering and refrigerating.
- If you plan to store the jelly at room temperature, transfer it while hot into properly prepared canning jars, again leaving about ¼ inch of headspace. Wipe the rims clean, apply the lids and bands, and process according to a tested boiling-water canning procedure. The supplied recipe specifies approximately 10 minutes in a boiling-water bath. After processing, let the jars cool undisturbed for 12–24 hours. Check the seals, label each jar with the date, and store sealed jars in a cool, dark place. Refrigerate after opening.