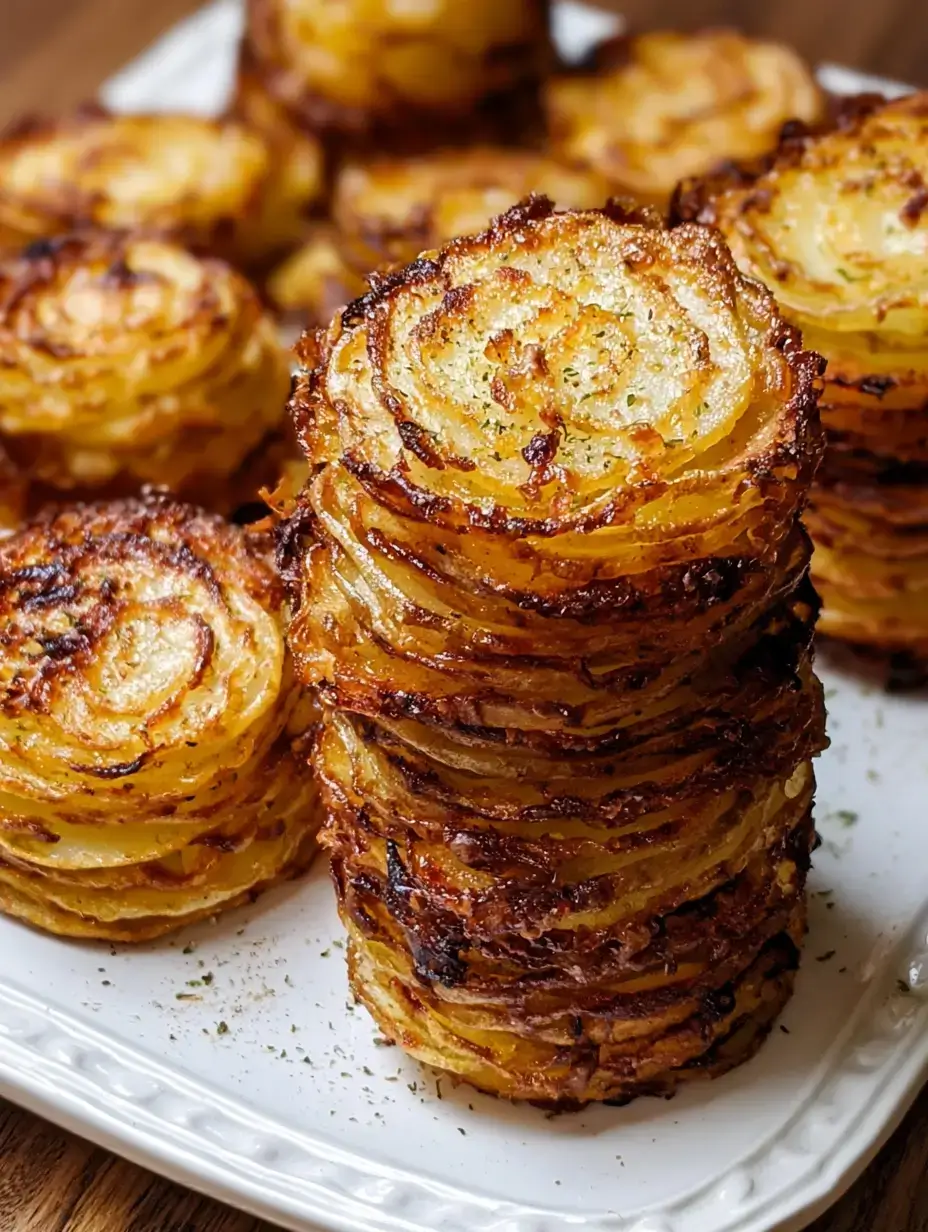
Three ingredients. One muffin tin. The most impressive potato side dish you have ever pulled from your oven. These crispy potato stackers are the kind of recipe that makes everyone at the table lean forward when the pan arrives — deeply golden, shatteringly crispy edges, buttery tender centers, and a presentation so beautiful that people assume they took hours and skill to make. They didn’t. Just Yukon Gold potatoes, melted butter, and sea salt. Ready in just over an hour and completely unforgettable.
Perfect for Sunday dinners, holiday tables, and any meal that deserves something a little more special alongside it. This is the three-ingredient recipe that earns the most compliments of any dish on the table.
Why You’ll Make This Again
The muffin tin is the genius of this recipe. It holds each stack of thinly sliced potatoes together during the long, hot bake — the layers compress slightly as they cook, the edges exposed to the direct heat of the tin turn deeply golden and crispy, and the interior layers steam in the butter until they are completely tender and almost custard-soft. When you pop each stacker out of the tin you get a perfectly formed individual potato portion with dramatically crispy edges all the way around and a layered, melt-in-your-mouth center that is unlike any other potato dish you have ever made. Three ingredients and this level of texture and flavor is genuinely remarkable.
These work beautifully all year round as a special side dish but are especially wonderful for holiday tables and dinner parties where you want something that looks genuinely impressive without adding hours of work to your cooking day.
How This Comes Together
Slice the potatoes thin, toss in butter and salt, stack in the muffin tin, and bake for 50 to 55 minutes. The entire hands-on time is about 15 minutes — the oven does everything else from there. The most important step is slicing the potatoes as thin and as evenly as possible — 1/8 inch is the target thickness that gives you crispy edges and a tender center in the same bake time. A mandoline makes this completely effortless and consistent, but a sharp knife and a steady hand work perfectly well too. Take the time to get the slices right and the rest of the recipe is completely foolproof.
What You’ll Need
Just three ingredients. Use Yukon Gold potatoes for the best result — their naturally buttery, creamy flavor and waxy texture make them significantly superior to russets for this recipe.
- 2 lb Yukon Gold potatoes, scrubbed
- 6 tbsp unsalted butter, melted
- 1 tsp fine sea salt, plus more to taste
Step-by-Step Directions
- Preheat oven to 400°F. Lightly grease a standard 12-cup muffin tin with melted butter or cooking spray.
- Using a sharp knife or mandoline slicer, slice the potatoes into very thin rounds approximately 1/8 inch thick. Do not peel the potatoes.
- Place all the potato slices in a large bowl. Pour the melted butter over the potatoes and sprinkle with the fine sea salt. Toss gently until every slice is evenly and thoroughly coated in butter.
- Stack the buttered potato slices into neat piles and place each stack into the prepared muffin cups, filling each cup nearly to the top and pressing down gently.
- Bake for 50–55 minutes until the edges are deeply golden and crispy and the centers are completely fork-tender.
- Remove from the oven and allow to rest in the muffin tin for 5 minutes before carefully loosening each stacker with a small knife or offset spatula.
- Serve warm with an extra sprinkle of sea salt if desired.
How to Serve It
Pop each golden stacker carefully out of the muffin tin and arrange on a large serving board or platter while still warm. They look absolutely stunning presented this way — each perfectly formed round with those dramatic crispy golden edges makes a platter that genuinely looks like it came from a fine dining kitchen. Serve alongside roasted chicken, a holiday turkey, grilled steak, or any protein that deserves a genuinely spectacular potato alongside it. For a casual dinner, set the whole board on the table with a small bowl of sour cream and fresh chives for dipping and let everyone help themselves. These pair beautifully alongside our Creamy Garlic Mushroom Chicken Skillet for a complete and deeply satisfying dinner.
Leftovers & Storage
Store leftover potato stackers in an airtight container in the fridge for up to 3 days. Reheat in the oven at 400°F for 8–10 minutes or in the air fryer at 400°F for 5–6 minutes until the edges are crispy again and the centers are warmed through. The air fryer gives the absolute best reheating result — the edges come back nearly as crispy as freshly baked in just a few minutes with no extra butter needed. Avoid the microwave — it makes the potato layers soft and the edges lose all their crispiness completely. These also freeze well after baking — cool completely, freeze on a tray until solid, then transfer to a freezer bag for up to 1 month. Reheat from frozen in the oven at 400°F for 15 minutes.
Make It Even Better (Pro Tips)
- Use a mandoline slicer for the most consistent, paper-thin slices — inconsistent thickness means some layers crisp perfectly while others stay undercooked in the same bake time.
- Don’t peel the potatoes — the skin adds texture, flavor, and nutrition and helps the outer layers of each stacker crisp up even more beautifully during baking.
- Toss the slices in the butter thoroughly before stacking — every slice needs to be individually coated for the most even browning and the richest buttery flavor throughout every layer.
- Press each stack firmly into the muffin cup before baking — a tightly packed stack holds together more cohesively during the bake and pops out of the tin far more cleanly.
- Grease the muffin tin very generously — potato starch can stick even in well-greased tins and a thorough coat of butter or cooking spray is essential for clean removal.
- Check at the 45-minute mark — every oven varies slightly and you want the edges deeply golden but not burned. If they need more color, continue for the full 55 minutes.
- Rest the full 5 minutes before removing — the stackers are quite fragile when piping hot and firm up significantly as they cool slightly, making them much easier to remove intact.
Easy Ways to Change It Up
- Garlic herb version: Add a teaspoon of garlic powder and a teaspoon of dried thyme or rosemary to the melted butter before tossing for a more aromatic, herb-forward stacker that feels more elevated and sophisticated.
- Cheesy version: Sprinkle a tablespoon of freshly grated Parmesan or shredded cheddar over each stack before baking for a golden, cheesy crust on top of every stacker.
- Truffle butter: Replace the regular butter with truffle butter for an indulgent, luxurious variation that transforms this simple three-ingredient recipe into something genuinely extraordinary.
- Loaded version: Top each warm stacker with a dollop of sour cream, crumbled bacon, shredded cheddar, and fresh chives right before serving for a fully loaded baked potato-inspired presentation.
- Sweet potato version: Swap the Yukon Gold potatoes for sweet potatoes for a slightly sweeter, more colorful stacker that pairs beautifully with a brown butter and sage variation of the basic recipe.
Quick Questions
Can I use a different type of potato?
Yukon Gold potatoes are strongly recommended for this recipe. Their naturally buttery, creamy flavor and waxy texture hold up beautifully through the long bake without becoming dry or falling apart between the layers. Russet potatoes are too starchy and dry for this technique — they tend to fall apart between layers rather than holding together as a cohesive stacker. Sweet potatoes work beautifully as an alternative and give a striking color and slightly sweeter flavor to the finished stacker.
Do I need a mandoline to make these?
A mandoline is strongly recommended but not absolutely essential. The key requirement is consistent 1/8 inch thickness across every slice — a mandoline achieves this effortlessly and safely in a fraction of the time. A sharp chef’s knife and a steady, practiced hand can also produce good results — take your time and try to keep each slice as even as possible. Inconsistent slices are the main cause of uneven cooking in this recipe so whatever tool you use, consistency is the priority.
My potato stackers are sticking to the tin — how do I fix it?
The most common cause is insufficient greasing before filling. Grease every cup very generously with melted butter or cooking spray — including the sides of each cup — before adding the potato stacks. A silicone muffin pan is an excellent alternative that releases the stackers far more reliably than a standard metal tin and is worth using if sticking is a consistent problem. Always rest the stackers for the full 5 minutes after baking before attempting to remove them — hot stackers are significantly more fragile and prone to sticking than slightly cooled ones.
Make these 3-ingredient crispy potato stackers for your next dinner and watch them become the most talked-about thing on the entire table. Tried them? Leave a comment below and tell me what you served them alongside! — AVA
3-Ingredient Crispy Potato Stackers
Ingredients
Equipment
Method
- Preheat oven to 400°F. Lightly grease a standard 12-cup muffin tin with melted butter or cooking spray.
- Using a sharp knife or mandoline slicer, cut the potatoes into thin rounds about 1/8 inch thick. Leave the skins on.
- Place the potato slices in a large bowl. Add the melted butter and sea salt, then toss gently until every slice is evenly coated.
- Stack the potato slices into neat piles and place each stack into the prepared muffin cups, pressing down gently.
- Bake for 50–55 minutes until the edges are deeply golden and crispy and the centers are fork-tender.
- Remove the muffin tin from the oven and let the stackers rest for 5 minutes.
- Carefully loosen each stacker with a small knife or offset spatula. Sprinkle with additional sea salt if desired and serve warm.